If you’re like me, you’ve come to rely on your robot vacuum to keep your floors spick and span without lifting a finger.
But what happens when that trusty little gadget starts showing signs of wear or suddenly breaks down?
Key Takeaways:
In short, while repairing a robot vacuum can be challenging, it is possible. Repairing your robot vacuum can save you money and help extend its lifespan. If you need to get your robot vacuum repaired, identify the issue and contact the manufacturer or reputable third-party repair service.
Read on to explore more on the most common problems of robot vacuums and their fixes along with other helpful insights about robot vacuum repair.
Can Robot Vacuums Be Repaired?
Yes, robot vacuums can be repaired, but it may not always be easy or cost-effective. One of the biggest challenges with repairing a robot vacuum is identifying the root issue. Unlike traditional vacuums, robot vacuums are complex machines with many moving parts and sensors.
However, there are benefits to repairing your robot vacuum rather than replacing it. For one, it can save you money in the long run.
If you need to get your robot vacuum repaired, the first step is to identify the issue.
Some common problems include battery issues, motor failures, and sensor malfunctions. Once you have identified the issue, you can contact the manufacturer or a third-party repair service provider to get it fixed.
Some manufacturers offer repair services for their products, while others do not. If your robot vacuum is still under warranty, you may be able to get it repaired for free. If not, you may need to pay for the repair out of pocket.
If you decide to go with a third-party repair service, make sure to do your research beforehand. Look for a reputable repair service with experience repairing robot vacuums. Additionally, make sure to get a quote for the repair before agreeing to any work.
What Are The Most Common Problems With Robot Vacuums And How To Fix
Robot vacuums have become a popular choice for cleaning floors, especially for those who don’t have the time or energy to do it themselves.
However, like any machine, they can encounter problems that need to be fixed. Here are some of the most common problems with robot vacuums and how to fix them.
Problem-1: Not Charging
CAUSE: The charging dock may not be properly plugged in or the charging cables may be damaged.
FIX: Check the charging dock and make sure it’s properly plugged in. If the charging cables are damaged, replace them with new ones.
Sometimes the batteries can be problematic as well and they might need a replacement. Here’s a guide about when to replace a robot vacuum battery for further information.
Problem-2: Not Cleaning Properly
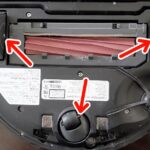
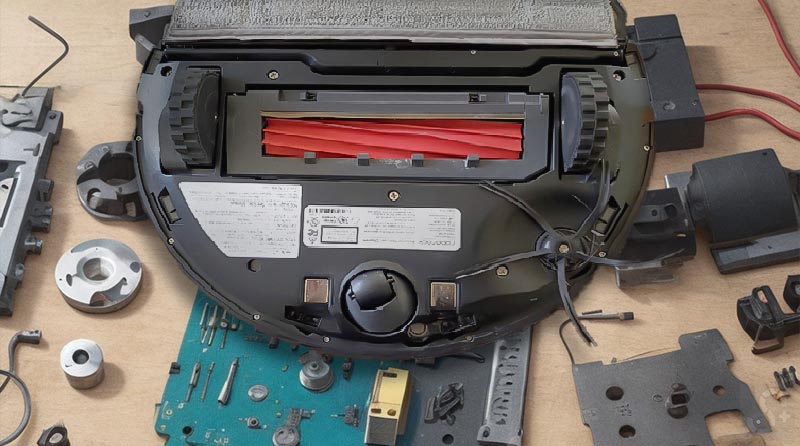
CAUSE: The dustbin may be full or the brushes may be clogged with dust, debris, or pet hair. The clogging of brush rolls is by far the most common cause of robot vacuum not working.
FIX: Empty the dustbin and clean the brushes. If the brushes are worn out, replace them with new ones. Also, make sure the robot vacuum is regularly maintained.
Speaking of troubleshooting, if you have a shark robot vacuum and are worried about its repair, look no further. Check out our detailed guide on the causes of fixes of a shark robot vacuum not working.
Problem-3: Getting Stuck Under Furniture
CAUSE: The robot vacuum may be too tall or the furniture may be too low.
FIX: Adjust the height of the robot vacuum or remove the furniture that’s causing the problem. For further information, check out the detailed guide on how to prevent the robot vacuum from going under furniture and getting stuck.
Problem-4: Not Enough Cleaning Power
CAUSE: The robot vacuum may not be suitable for bare floors or the cleaning power may be reduced due to a dirty dustbin or clogged filters.
FIX: Use a robot vacuum that’s suitable for bare floors or clean the dustbin and filters regularly.
Problem-5: Not Navigating Properly
CAUSE: The robot vacuum may not be able to navigate properly due to obstacles, lack of sensors, or some technical issues.
FIX: Remove any obstacles that may be blocking the robot vacuum’s path. Also, make sure the robot vacuum has enough sensors to navigate properly.
And if it is some software or technical issue, you can also rest the robot vacuum to its default settings to see if it fixes the problem. You can check out our guide on how to reset shark robot vacuums to get an idea of the complete procedure.
Problem-6: Docking Issues
CAUSE: The robot vacuum may not be able to dock properly due to a dirty charging dock or a faulty motor.
FIX: Clean the charging dock and make sure it’s not obstructed. If the motor is faulty, replace it with a new one. There could be software or connectivity reasons as well.
You might also want to check out this related guide on fixing a shark robot vacuum that keeps returning to the dock for further knowledge.
Problem-7: Side Brush Not Working
CAUSE: The side brush may be clogged with dust, debris, or pet hair.
FIX: Clean the side brush regularly. If it’s worn out, replace it with a new one.
How Much Does It Cost To Repair A Robot Vacuum?
When it comes to repairing a robot vacuum, the cost can vary depending on the type of repair needed and the brand of the vacuum. On average, the cost to repair a robot vacuum can range from $50 to $400.
To give you a better idea of the costs associated with different types of repairs, here is a table outlining the most common repair types and their associated costs:
| Repair Type | Cost |
| Battery Replacement | $50 – $100 |
| Motor Replacement | $100 – $200 |
| Sensor Replacement | $150 – $300 |
| Cleaning and Maintenance | $50 – $100 |
It’s important to note that these costs are just estimates and can vary depending on the brand and model of your robot vacuum.
Additionally, some repairs may be covered under warranty, so it’s worth checking with the manufacturer before paying for repairs out of pocket.
Where Can I Get My Robot Vacuum Repaired?
Firstly, if your robot vacuum is still under warranty, you should contact the manufacturer’s customer service.
They will be able to help you troubleshoot the problem and may offer to repair or replace the device for free.
If your warranty has expired, you can look for a repair service. Many electronics stores offer repair services for robot vacuums, and there are also online repair services available. Some popular repair services include:
- iRobot Repair Center
- Best Buy Geek Services
When choosing a repair service, make sure to read reviews and compare prices to find the best option for you.
Can I Fix A Robot Vacuum Myself?
If you prefer to repair your robot vacuum yourself, you can order replacement parts online. Many manufacturers offer replacement parts for their devices, and there are also third-party sellers that offer compatible parts.
When it comes to fixing a robot vacuum, there are some problems that you can fix yourself, and others that require expert help.
If you are comfortable with troubleshooting and have some basic technical skills, you may be able to fix some issues on your own.
Here are some common problems that you may be able to fix yourself:
- Clogged filters – If your robot vacuum is not picking up dirt or debris, it may be due to clogged filters. You can clean or replace the filters to improve its performance.
- Dirty sensors – If the sensors on your robot vacuum are dirty, it may not be able to navigate properly. You can clean the sensors with a soft cloth to improve its performance.
- Broken wheels – If one of the wheels on your robot vacuum is broken, you may be able to replace it yourself. You can purchase replacement wheels online or from the manufacturer.
However, there are some problems that require expert help. For example:
- Motor issues – If the motor on your robot vacuum is not working, it may require professional repair or replacement.
- Battery problems – If your robot vacuum is not holding a charge or is not charging properly, it may require a new battery. This is a complex repair that should be done by a professional.
- Navigation issues – If your robot vacuum is not navigating properly or is getting stuck frequently, it may require software updates or repairs that should be done by a professional.
Pros And Cons Of Repairing A Robot Vacuum Instead Of Buying A New One
When your robot vacuum breaks down, you may be wondering whether to repair it or replace it. Here are some pros and cons of repairing a robot vacuum instead of buying a new one:
| Pros | Cons |
| Saves money | May not be covered by warranty |
| Reduces waste | May not be cost-effective for older models |
| Can extend the lifespan of your vacuum | May not be able to find replacement parts |
| May be quicker than buying a new one | May not fix underlying issues |
A major advantage of repairing your robot vacuum is that it can save you money. Repairing your vacuum can also reduce waste and extend its lifespan.
However, repairing your robot vacuum may not be the best option for everyone. For example, if your vacuum is still under warranty, it may be more cost-effective to have it replaced by the manufacturer.